Windows Setup
This guide covers installing the Axelera software on Windows 11. The main path is native Windows — you install the driver and Axelera components directly on Windows without WSL.
What works where
Feature Ubuntu (Linux) Windows (Native) Windows (WSL2) Network deployment Yes No Yes Inference Yes AxRuntime API only No For model deployment, you need Linux or WSL2 — see Step 2 below.
Step 1: Install the Windows driver
The Axelera Windows driver is not yet Microsoft-certified (certification is in progress). Until then, it requires testsigning mode to install.
1a. Disable BitLocker (if active)
Disable BitLocker before running any bcdedit command. Modifying boot configuration while BitLocker is active will put the system into BitLocker recovery on the next reboot. You will need your recovery key to regain access.
To temporarily suspend BitLocker:
- Open the Windows search bar, type BitLocker, and select Manage BitLocker
- If BitLocker is active, click Suspend protection and confirm
- BitLocker reactivates automatically after the next reboot — suspend it again before any future
bcdeditchanges
1b. Enable testsigning
Open a Command Prompt as Administrator and run:
bcdedit /set testsigning on
Restart your PC. The desktop will show "Test Mode" in the lower-right corner — this confirms testsigning is active.
1c. Grant "Lock pages in memory" privilege
This step is required once per machine. The Axelera runtime needs the Lock pages in memory privilege to operate correctly.
- Press Win + S, type
secpol.msc, and press Enter to open the Local Security Policy editor - In the left pane, navigate to Local Policies → User Rights Assignment
- In the right pane, double-click Lock pages in memory
- Click Add User or Group, enter your Windows username, and confirm
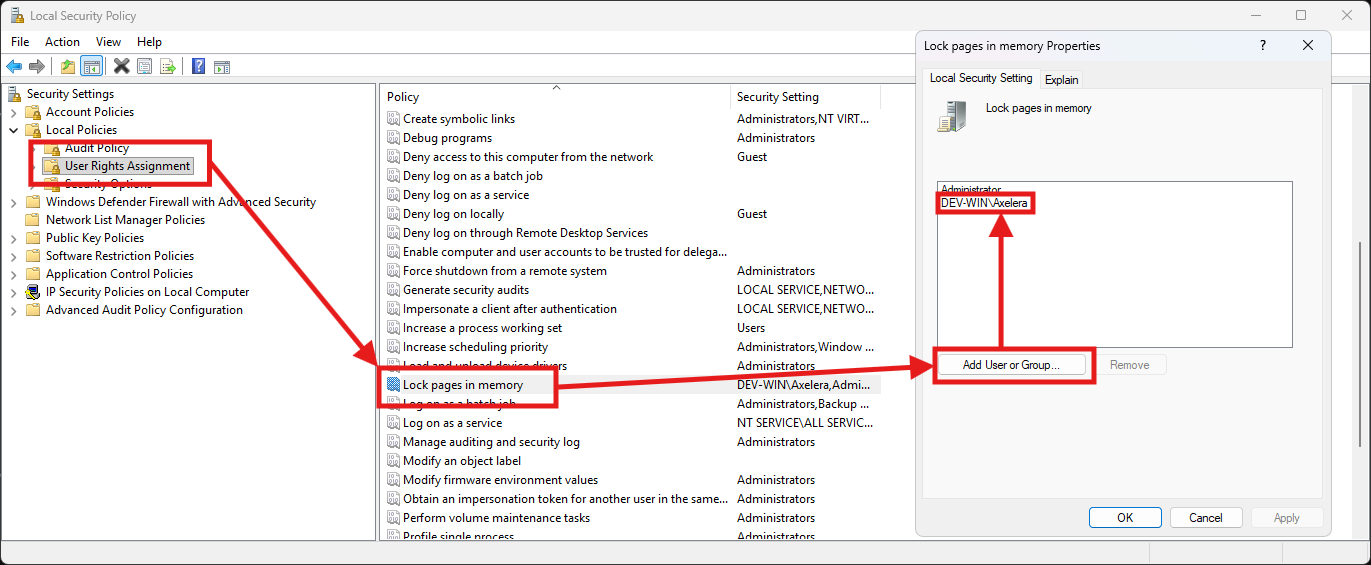
Log out and back in (or reboot) for the privilege to take effect.
1d. Download the drivers
Download the driver archives from the Axelera software portal:
- Metis driver (required for all hardware): MetisDriver-1.3.11.zip
- Switchtec PCIe switch driver (required only for the Metis PCIe 4-AIPU card): switchtec-kmdf-0.7_2019.zip
Extract each archive locally. Each extracted folder contains three files: .cat, .inf, and .sys.
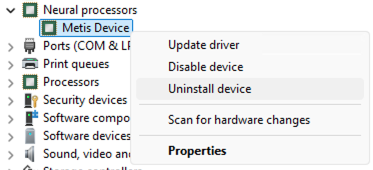
1e. Remove any previous driver version
First-time install? Skip this step and go straight to 1f.
If you already have an older Metis driver installed, remove it completely before installing the new one. Windows can keep multiple drivers for the same device.
In Device Manager, locate the Metis device under Neural Processors, right-click and select Uninstall device:
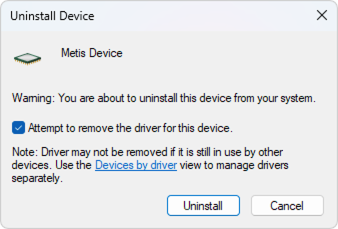
In the confirmation dialog, check "Attempt to remove the driver for this device", then click Uninstall:
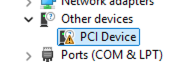
Verify the device now appears under Other devices as a generic PCI Device — this confirms the driver is fully removed:
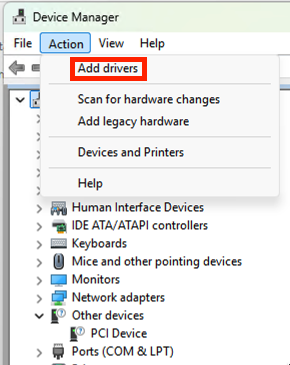
1f. Install via Device Manager
Open Device Manager (right-click the Windows Start button → Device Manager).
From the menu, open Action → Add Drivers:
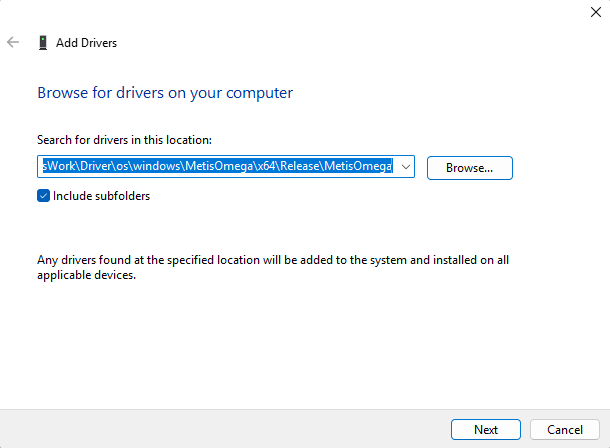
Set the path to the folder where you extracted the Metis driver files:
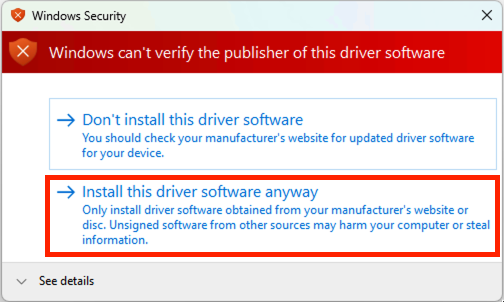
Select Install the driver anyway when prompted:
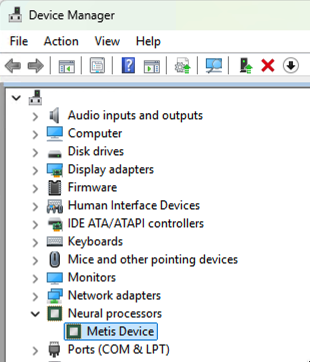
Confirm that the Metis device now appears under Neural Processors:
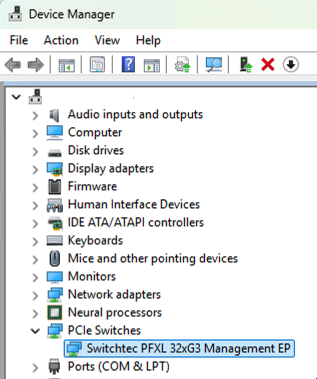
If you have a Metis PCIe 4-AIPU card, repeat the same steps for the Switchtec driver:
Step 2 (Optional): Install WSL2 for model deployment
Skip this step if you only need inference. If you want to deploy your own models or use the full SDK tooling, install WSL2 and follow the Linux setup inside it.
Network deployment is supported exclusively in Linux. WSL2 is the recommended approach for deploying models for Windows use.
2a. Install WSL2
Open PowerShell as Administrator and run:
wsl --install -d Ubuntu-22.04
Restart your computer when prompted. After restart, Ubuntu opens and asks you to create a username and password.
Already have WSL? Check your version: wsl --list --verbose. You need WSL 2 (not 1). Upgrade with wsl --set-version Ubuntu-22.04 2.
2b. Clone the SDK in a Windows-accessible folder
After the restart, open a regular Command Prompt (not PowerShell, not Administrator) and enter WSL:
wsl
Inside WSL, clone to a path under /mnt/c/ so both Windows and WSL can reach it:
# /mnt/c/ maps to C:\ on Windows
cd /mnt/c/Axelera
git clone https://github.com/axelera-ai-hub/voyager-sdk.git
cd voyager-sdk
This means:
- From WSL:
/mnt/c/Axelera/voyager-sdk - From Windows:
C:\Axelera\voyager-sdk
2c. Follow the Linux setup inside WSL
Install the SDK inside WSL, then use it for model deployment:
- SDK Install — clone, install, and activate
- deploy.py — compile and deploy models for use on Windows
When running install.sh inside WSL, do not select the driver installation option — the driver was installed on the Windows side in Step 1, not inside WSL.
The Metis device is not accessible from inside WSL. Hardware verification and inference run on the Windows side (Steps 3–6 below).
Step 3: Install Python (Windows native)
Perform this step in Windows natively, not in WSL.
- Download Python for Windows from the official website. The latest stable release tested by Axelera is 3.13.5.
Install Python from the official website link above — not from the Microsoft Store.
-
During installation:
- Enable "Add Python to PATH"
- Select "Disable path length limit" when prompted
-
Add the Python installation path and the
Python\Scriptspath to the Windows Path environment variable: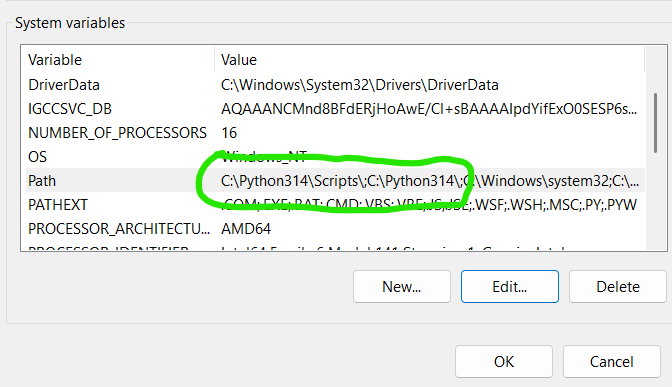
-
Create a virtual environment:
python -m venv venv-win
Step 4: Install Windows Axelera components
Perform this step in Windows natively, not in WSL.
Open a regular Command Prompt (not PowerShell, not Administrator) and navigate to your SDK directory:
cd C:\Axelera\voyager-sdk
Create a local download directory and download all packages:
rmdir /s /q windows-packages 2>nul
mkdir windows-packages
cd windows-packages

curl -L -O https://software.axelera.ai/artifactory/axelera-win/packages/1.6.x/axelera-win-device-installer.exe
curl -L -O https://software.axelera.ai/artifactory/axelera-win/packages/1.6.x/axelera-win-runtime-installer.exe
curl -L -O https://software.axelera.ai/artifactory/axelera-win/packages/1.6.x/axelera-win-syslibs-installer.exe
curl -L -O https://software.axelera.ai/artifactory/axelera-win/packages/1.6.x/axelera-win-toolchain-deps-installer.exe
curl -L -O https://software.axelera.ai/artifactory/axelera-win/packages/1.6.x/axelera-win-services-installer.exe

cd ..
4a. Install the executable packages
If any previous Axelera packages are installed, uninstall them via Apps & Features before proceeding.
Using Windows Explorer, navigate to C:\Axelera\voyager-sdk\windows-packages and run each .exe installer in sequence.
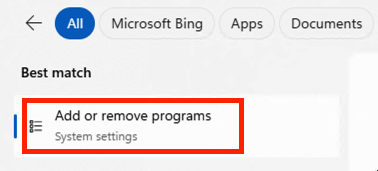
After installation, verify via Settings → Apps & features (or Add or remove programs):
All five packages must be listed:
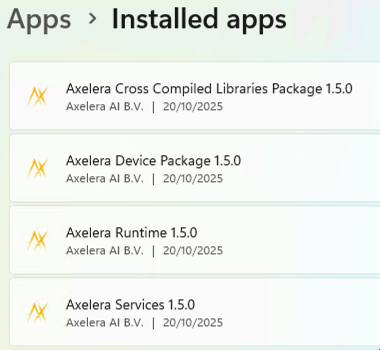
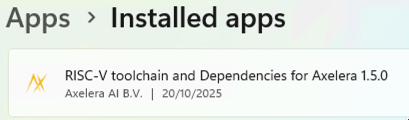
You must see: Axelera Cross Compiled Libraries Package, Axelera Device Package, Axelera Runtime, Axelera Services, and RISC-V Toolchain and Dependencies for Axelera. Exact version numbers will vary.
Close all Command Prompt and PowerShell windows after the installers complete, then open a new Command Prompt before continuing.
4b. Install Python packages
Activate the virtual environment and install the packages:
venv-win\Scripts\activate.bat

pip install --extra-index-url https://software.axelera.ai/artifactory/api/pypi/axelera-pypi/simple axelera-runtime==1.6.1 axelera-llm==1.6.1 axelera-types==1.6.1
Re-activating the environment: Remember to activate the virtual environment each time you open a new Command Prompt. From your SDK directory:
venv-win\Scripts\activate.bat
You'll know it's active when (venv-win) appears at the start of your prompt.
Step 5: Run examples
First, obtain a deployed model. If you completed the WSL2 setup in Step 2 and deployed a model there, it is accessible from Windows at C:\Axelera\voyager-sdk\build\. Otherwise, download a pre-built model:
axdownloadmodel resnet50-imagenet-onnx
The model downloads to C:\Axelera\voyager-sdk\build\.
Run inference using the axrunmodel utility (measures performance):
axrunmodel C:\Axelera\voyager-sdk\build\resnet50-imagenet-onnx\resnet50-imagenet-onnx\1\model.json
Run inference using the Python API:
Download an image to C:\Axelera\voyager-sdk\examples\axruntime\images, then:
cd examples\axruntime
python -m axruntime_example -v --aipu-cores 1 --labels imagenet-labels.txt ..\..\build\resnet50-imagenet-onnx\resnet50-imagenet-onnx\1\model.json images
Step 6: Run LLM models
A set of precompiled LLM models can run natively on Windows. To see available models:
axllm --help-network
Run a model in single-prompt mode:
axllm llama-3-2-1b-1024-4core-static --prompt "Give me a joke"
Run interactively in chat mode:
axllm llama-3-2-1b-1024-4core-static
For all options, see the LLM Inference Guide.
Using PowerShell
After completing installation, you can use PowerShell instead of Command Prompt. The only difference is how you activate the virtual environment:
.\venv-win\Scripts\Activate.ps1
Once activated, all the same commands work as in Command Prompt.
PowerShell execution policy If you get an error activating the environment in PowerShell, your execution policy may be blocking unsigned scripts. Check your current policy:
Get-ExecutionPolicy
If needed, set a more permissive policy (run PowerShell as Administrator):
Set-ExecutionPolicy RemoteSigned
Use Command Prompt (not PowerShell) for the installation steps — particularly Step 4a. PowerShell is fine for running examples and day-to-day use after setup is complete.
Troubleshooting
| Symptom | Fix |
|---|---|
BitLocker recovery after bcdedit | Suspend BitLocker before running bcdedit — see Step 1a |
"Test Mode" not showing after bcdedit | Confirm the command ran in an Administrator prompt; restart again |
| Metis not detected in Device Manager | Confirm testsigning is enabled and reboot; check driver install via Device Manager |
wsl --install fails | Enable "Virtual Machine Platform" in Windows Features |
| WSL shows version 1 | wsl --set-version Ubuntu-22.04 2 |
| PowerShell can't activate venv | Run Set-ExecutionPolicy RemoteSigned as Administrator, then retry |
| Installer fails silently | Uninstall all previous Axelera packages first via Apps & Features |
See also
- SDK Install — the main Linux/WSL installation guide
- Verify Setup — confirm hardware and SDK are working
- LLM Inference Guide — full LLM options including Windows